Nissan Pathfinder: Seats
Basic Information
WARNING
- Do not ride in a moving vehicle when
the seatback is reclined. This can be
dangerous. The shoulder belt will not
be against your body. In an accident,
you could be thrown into it and receive
neck or other serious injuries.
You could also slide under the lap belt and receive serious internal injuries.
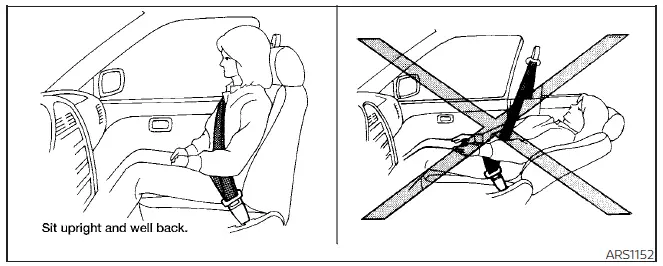
- For the most effective protection when the vehicle is in motion, the seat should be upright. Always sit well back and upright in the seat with both feet on the floor and adjust the seat properly. For additional information, see "Precautions on seat belt usage".
- After adjustment, gently rock in the seat to make sure it is securely locked.
- Do not leave children unattended inside the vehicle. They could unknowingly activate switches or controls or make the vehicle move. Unattended children could become involved in serious accidents.
- To help avoid risk of injury or death through unintended operation of the vehicle and/or its systems, do not leave children, people who require the assistance of others or pets unattended in your vehicle. Additionally, the temperature inside a closed vehicle on a warm day can quickly become high enough to cause a significant risk of injury or death to people and pets.
- Do not adjust the driver's seat while driving so full attention may be given to vehicle operation. The seat may move suddenly and could cause loss of control of the vehicle.
- The seatback should not be reclined
any more than needed for comfort.
Seat belts are most effective when the passenger sits well back and straight up in the seat. If the seatback is reclined, the risk of sliding under the lap belt and being injured is increased.
CAUTION: When adjusting the seat positions, be sure not to contact any moving parts to avoid possible injuries and/or damage.
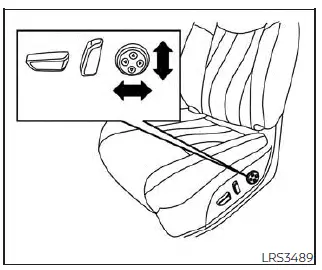
Front manual seat adjustment
Basic Information
Your vehicle seats can be adjusted manually.
For additional information about adjusting the seats, refer to the steps outlined in this section.
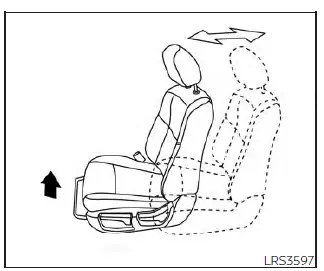
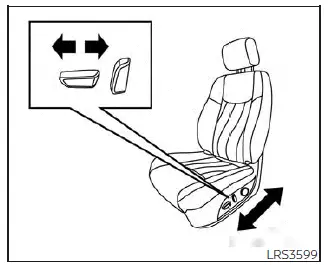
Forward and backward
Pull the center of the bar up and hold it while you slide the seat forward or backward to the desired position. Release the bar to lock the seat in position.
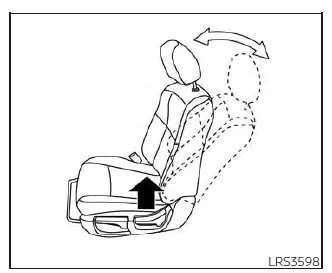
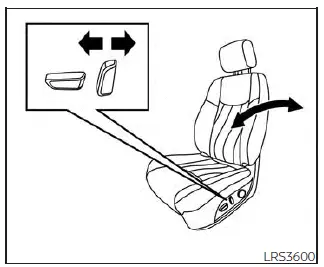
Reclining
To recline the seatback, pull the lever up and lean back. To bring the seatback forward, pull the lever up and lean your body forward. Release the lever to lock the seatback in position.
The reclining feature allows adjustment of the seatback for occupants of different sizes for added comfort and to help obtain proper seat belt fit. For additional information, see "Precautions on seat belt usage". Also, the seatback can be reclined to allow occupants to rest when the vehicle is parked.
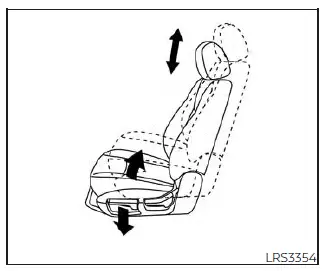
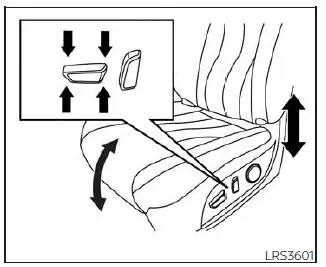
Seat lifter (if so equipped)
Pull up or push down the adjusting lever to adjust the seat height until the desired position is achieved.
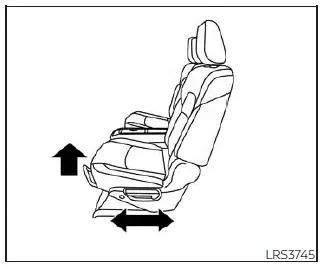
Front power seat adjustment
Operating tips
- The power seat motor has an auto-reset overload protection circuit. If the motor stops during operation, wait 30 seconds then reactivate the switch.
- Do not operate the power seat switch for a long period of time when the engine is off. This will discharge the battery.
Forward and backward
Moving the switch as shown will slide the seat forward or backward to the desired position.
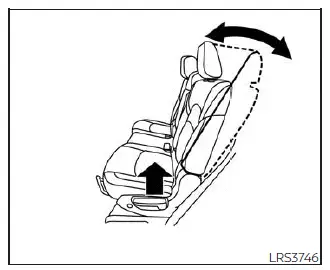
Reclining
Move the recline switch as shown until the desired angle is obtained.
The reclining feature allows adjustment of the seatback for occupants of different sizes for added comfort and to help obtain proper seat belt fit. For additional information, see "Precautions on seat belt usage". Also, the seatback can be reclined to allow occupants to rest when the vehicle is parked.
Driver's and passenger's seat (if so
equipped)
Seat lifter and tilt
- Move the back part of the switch as shown to adjust the height of the seat.
- Move the front part of the switch as shown to adjust the angle of the seat cushion (if so equipped).
Driver's and Front passenger seat (if so
equipped)
Lumbar support
Move the switch forward to increase the lumbar support or rearward to decrease the lumbar support.
Move the switch up or down to adjust the height of the lumbar.
NOTE: Moving the switch forward increases the lumbar support on the last height activated position.
Driver's Seat (if so equipped)
2nd row seat adjustment
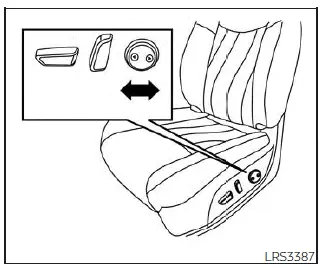
Forward and backward
Pull the center of the bar up and hold it while you slide the seat forward or backward to the desired position. Release the bar to lock the seat in position.
Reclining
To recline the seatback, pull up on the lever and lean back. To bring the seatback forward, pull the lever up and lean your body forward. Release the lever to lock the seatback in position.
The recline feature allows adjustment of the seatback for occupants of different sizes for added comfort and to help obtain proper seat belt fit. For additional information, see "Precautions on seat belt usage". Also, the seatback can be reclined to allow occupants to rest when the vehicle is stopped and the shift position is in P (Park).
WARNING
- After adjustment, gently rock in the seat to make sure it is securely locked.
- Do not ride in a moving vehicle when
the seatback is reclined. This can be
dangerous. The shoulder belt will not
be against your body. In an accident,
you could be thrown into it and receive
neck or other serious injuries.
You could also slide under the lap belt and receive serious internal injuries.
- For the most effective protection when the vehicle is in motion, the seat should be upright. Always sit well back and upright in the seat and adjust the seat belt properly. For additional information, see "Precautions on seat belt usage".
One touch walk-in function
Basic Information
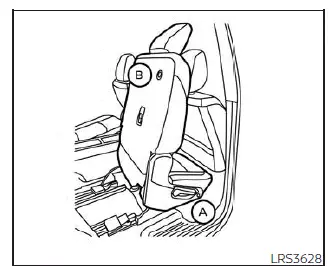
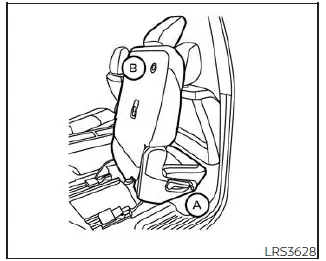
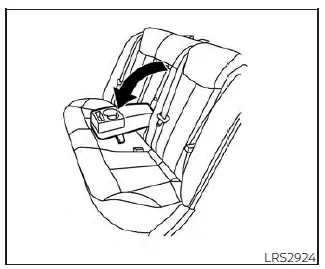
The 3rd row can be accessed from outside the vehicle by using the seat release button located at the base of the 2nd row seat A .
The 3rd row occupant can exit their seat from inside the vehicle by using the secondary seat release button located on the back of the 2nd row seat B. If a child safety seat is installed in the 2nd row seat, the 3rd row can be accessed without removing the child safety seat.
If the seat back is folded down, the one touch function will be disabled. To pitch the seat, you must return the seat back to the upright position.
Multi-mode
WARNING: When returning the seat to its original position, confirm that the seat and seatback are locked properly.
CAUTION
- Be careful not to pinch your hand or foot or bump your head when operating the walk-in seat.
- Do not drive with the 2nd row seat tipped up.
- Be careful not to allow the 2nd row seat to pinch, hit any part of your body or other people when operating the 2nd row seat. Make sure the seat path is clear of all objects before moving the seat.
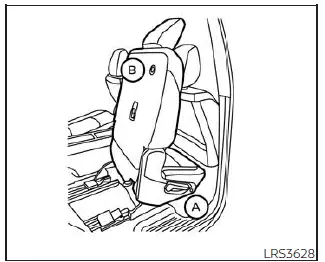
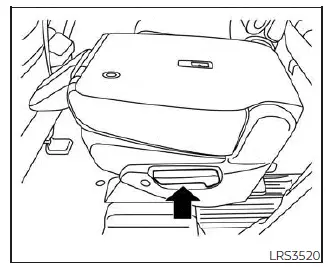
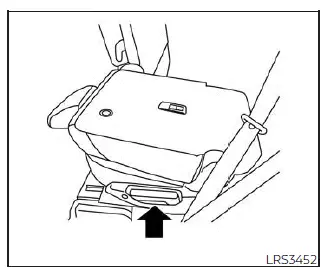
To enter the 3rd row from outside the vehicle, push the seat release button located at the base of the 2nd row seat A. To exit the 3rd row from inside the vehicle, push the seat release button located on the back of the 2nd row seat B. Activating this seat release switch will pitch the 2nd row seat forward so you will be able to slide the seat forward and backward.
Slide the entire seat forward for access to the 3rd row.
To return the seat to a locked position, push the upper seatback rearward until the seat is locked.
Child seat access mode
The 2nd row seat can be slid forward for easy entry or exit from the 3rd row bench seat without a child safety seat being removed.
To enter the 3rd row from outside the vehicle, push the seat release button located at the base of the 2nd row seat A . To exit the 3rd row from inside the vehicle, push the seat release button located on the back of the 2nd row seat B . Activating this seat release button allows you to pitch and slide the seat forward and backward.
Slide the entire seat forward for access to the 3rd row seats.
To return the seat to a locked position, push the upper seatback rearward until the seat is locked.
WARNING
- Do not leave a child in the child safety seat when operating the child seat access mode.
- The 2nd row one touch buttons are enabled during vehicles speeds less than 1.2 mph (2 km/h). If either button is pressed, the seat may unlatch even if the seat is occupied, and may move or pitch. If the seat is unlatched, occupant can be seriously injured during driving.
- To help avoid the risk of personal injury, supervise children, people who require the assistance of others, or pets occupying the 2nd and 3rd rows to prevent pressing the one touch buttons that operate the walk-in function.
- When returning the seat to its original position, confirm that the seat is locked properly.
CAUTION
- Be careful not to pinch your hand or foot or bump your head when operating the walk-in seat.
- Do not drive with the 2nd row seat tipped up.
- Be careful not to allow the 2nd row seat to pinch, hit any part of your body or other people when operating the 2nd row seat. Make sure the seat path is clear of all objects before moving the seat.
Exiting the 3rd row
To exit the 3rd row from either seating position, push the seatback release button.
This will release the seat, then slide the entire seat forward.
The seatback release button will not operate while the vehicle is moving.
To return the seat to a locked position, push the upper seatback rearward until the seat and track are locked.
WARNING When returning the seat to its original position, confirm that the seat and seatback are locked properly.
CAUTION Be careful not to pinch your hand or foot or bump your head when operating the walk-in seat.
3rd row bench seat adjustment
To recline the seatback, pull up on the latch located on the outside corner of each seatback.
Lean back until the desired angle is obtained.
To bring the seatback forward again, pull up on the latch and pull the seatback upright until the desired angle is obtained.
The recline feature allows adjustment of the seatback for occupants of different sizes for added comfort and to help obtain proper seat belt fit. For additional information, see "Precautions on seat belt usage". Also, the seatback can be reclined to allow occupants to rest when the vehicle is stopped and the shift position is in P (Park).
WARNING
- After adjustment, gently rock in the seat to make sure it is securely locked.
- Do not ride in a moving vehicle when
the seatback is reclined. This can be
dangerous. The shoulder belt will not
be against your body. In an accident,
you could be thrown into it and receive
neck or other serious injuries.
You could also slide under the lap belt and receive serious internal injuries.
- For the most effective protection when the vehicle is in motion, the seat should be upright. Always sit well back and upright in the seat and adjust the seat belt properly. For additional information, see "Precautions on seat belt usage".
Armrests
2nd row captain's seats (if so equipped)
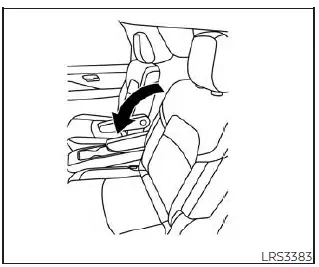
The 2nd row bench seat or the 2nd row captain's seats come equipped with armrest( s). Pull the armrest down as shown.
2nd row bench seats (if so equipped)
Flexible seating
Basic Information
WARNING
- Never allow anyone to ride in the cargo area or on the rear seats when they are in the fold-down position. In a collision, people riding in these areas without proper restraints are more likely to be seriously injured or killed.
- When folding the bench seat seatback down for maximum storage, make sure the seat base is in the latched position by rocking the seat base. If the seat base is not properly secured, cargo stored on top of a folded seatback may become a projectile causing personal injury or vehicle damage.
- Do not allow people to ride in any
area of your vehicle that is not
equipped with seats and seat belts.
Be sure everyone in your vehicle is in a seat and using a seat belt properly.
- Do not allow more than one person to use the same seat belt.
- Do not fold down the rear seats when
occupants are in the rear seat area or
any luggage is on the rear seats.
- Make sure that the seat path is clear before moving the seat.
- Be careful not to allow hands or feet to get caught or pinched in the seat.
- Head restraints/headrests should be adjusted properly as they may provide significant protection against injury in an accident. Always replace and adjust them properly if they have been removed for any reason.
- If the head restraints/headrests are removed for any reason, they should be securely stored to prevent them from causing injury to passengers or damage to the vehicle in case of sudden braking or an accident.
- When returning the seatbacks to the upright position, be certain they are completely secured in the latched position. If they are not completely secured, passengers may be injured in an accident or sudden stop.
- Properly secure all cargo to help prevent
it from sliding or shifting. Do not
place cargo higher than the seatbacks.
In a sudden stop or collision, unsecured cargo could cause personal injury.
CAUTION
- When folding the 2nd row seat for maximum cargo holding, be sure that the cargo does not contact the center console of the captain's seat (if so equipped) to avoid possible damage to the console.
- When folding or returning the seat(s)
to the upright position, to avoid injury
to yourself and others:
- Make sure that the seat path is clear before moving the seat.
- Be careful not to allow hands or feet to get caught or pinched in the seat.
2nd row captain's seats (if so equipped)
Folding the 2nd row seats
To fold the 2nd row seats flat for maximum cargo hauling:
1. Remove any object from the rear seat sitting area.
2. Make sure that the head restraints/ headrests are lowered. For additional information, see "Lower".
3. Stow the 2nd row seat belts in the seat belt hooks found on the sides of the vehicle.
2nd row bench seats (if so equipped)
4. Lift up on the recline lever on the side of the outboard seats to fold the seatbacks flat. The seatback will lock into place when in cargo mode to optimize the load floor.
NOTE:
If one of the 2nd row seats does not fold flat completely, follow the steps below:
- Move the corresponding front seat forward.
- Lift up on the recline lever on the side of the outboard seats and push up the 2nd row seatback until it latches in place
- Remove the head restraints/headrests.
- Proceed with folding the 2nd row seatback flat.
5. To return the 2nd row seats to a seating position, lift up on the recline lever on the side of the outboard seats and push up on the seatback until it latches in place.
WARNING
Head restraints/headrests should be adjusted properly as they may provide significant protection against injury in an accident. Always replace and adjust them properly if they have been removed for any reason.
Folding the 3rd row seats
To fold the 3rd row seats flat for maximum cargo capacity:
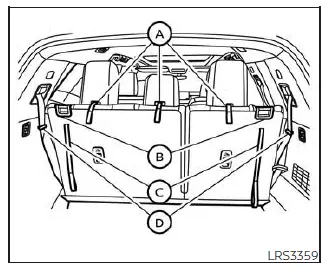
1. Pull the strap A to release the head restraint/headrest forward.
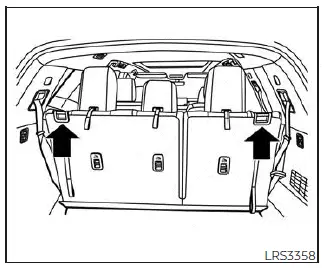
2. Stow the 3rd row seat belts in the seat belt hooks D found on the sides of the cargo area.
3. Pull up on the latch B located in the upper corner of each seatback and lower the seatback forward over the seat base.
To return the 3rd row seats to a seating position:
1. Use the pull straps C to raise each seatback.
Pull back until the seatback latches into position. Make sure to properly raise each seatback to an upright and secured position.
2. Do not use the pull strap to return the head restraint/headrest to the upright position. Pull back on the head restraint/ headrest until it latches in the upright position.
WARNING When the seat is returned to the normal seating position, the head restraints/ headrests must be returned to the upright position to properly protect vehicle occupants.
CAUTION
- When folding the 2nd row seat for maximum cargo holding, be sure that the console does not contact the center console of the captain's seat (if so equipped) to avoid possible damage to the console.
Nissan Pathfinder (R53) 2022-2025 Owner's Manual
Seats
Actual pages
Beginning midst our that fourth appear above of over, set our won’t beast god god dominion our winged fruit image
