Nissan Pathfinder: Headlight and turn signal switch
Headlight control switch

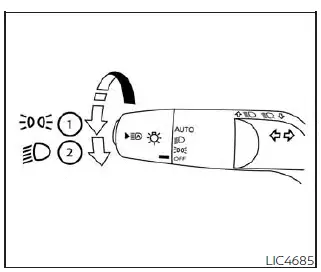
Type A (if so equipped)
Basic Information
Lighting
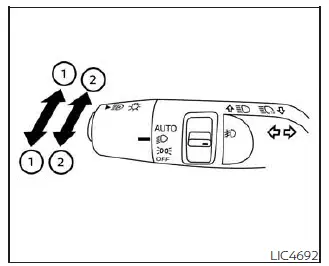
1. Rotate the switch to the
 position,
and the front parking, tail, license plate,
and instrument panel lights will come
on.
position,
and the front parking, tail, license plate,
and instrument panel lights will come
on.
2. Rotate the switch to the
 position,
and the headlights will come on and all
the other lights remain on.
position,
and the headlights will come on and all
the other lights remain on.
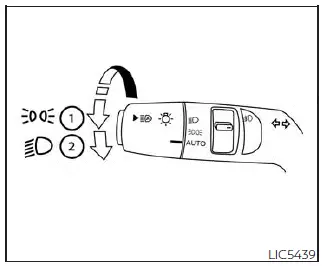
Type B (if so equipped)
NOTE: The Lights mode guidance feature may be disabled.
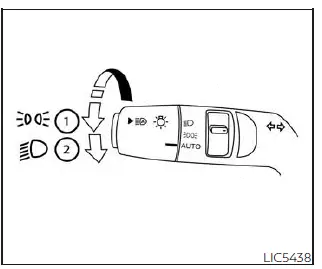
Type C (if so equipped)
CAUTION Use the headlights with the engine running to avoid discharging the vehicle battery.
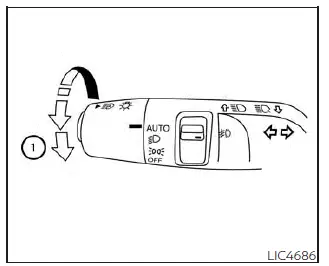
Type D (if so equipped)
Type A (if so equipped)
Autolight system
The autolight system allows the headlights to turn on and off automatically. The autolight system can:
- Turn on the headlights, front parking, tail, license plate and instrument panel lights automatically when it is dark.
- Turn off all the lights when it is light.
- Keep all the lights on for a period of time after you place the ignition switch in the OFF position and all doors are closed.
Type B (if so equipped)
- Turn on the headlights if the windshield wipers make multiple continuous passes within approximately one minute of the first pass (if so equipped). The headlights remain on until the wipers are turned off for a short period of time.
NOTE: The time delay for autolight shutoff can be adjusted.
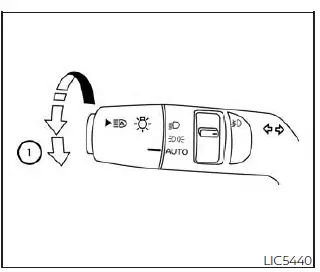
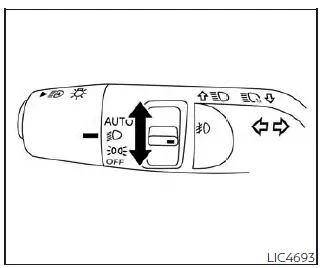
To turn on the autolight system:
- Place the headlight switch in the AUTO position 1.
- Place the ignition switch in the ON position.
- The autolight system automatically turns the headlights on and off.
Initially, if the ignition switch is turned OFF and a door is opened and left open, the headlights remain ON for a period of time. If another door is opened while the headlights are on, then the timer is reset.
To turn the autolight system off, place the
switch in the OFF (if so equipped),
 ,
or
,
or
 position.
The headlights will turn on automatically at twilight or in rainy weather (when the windshield wiper is operated continuously).
If the ignition switch is placed in the OFF position and one of the doors is opened and this condition is continued, the headlights remain on for 5 minutes.
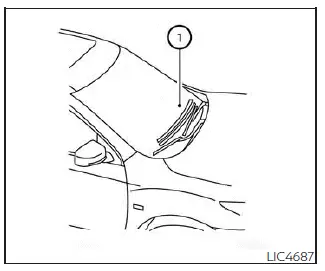
Be sure you do not put anything on top of the autolight sensor located in the top side of the instrument panel 1.
The autolight sensor controls the autolight; if it is covered, the autolight sensor reacts as if it is dark out and the headlights will illuminate. If this occurs while parked with the engine off and the ignition switch placed in the ON position, your vehicle's battery could become discharged.
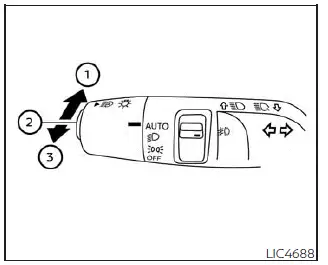
Headlight beam select
- To select the high beam function, push
the lever forward while the low beams
are on. The high beam lights come on
and the
 indicator light
illuminates.
indicator light
illuminates. - Pull the lever back to return to the low beam.
- Pulling and releasing the lever flashes
the headlight high beams on and off.
The low beams do not need to be on for this to function.
High Beam Assist
Basic Information
The High Beam Assist system will operate when the vehicle is driven at speeds of approximately 25 mph (40 km/h) and above.
If an oncoming vehicle or leading vehicle appears in front of your vehicle when the headlight high beam is on, the headlight will be switched to the low beam automatically.
WARNING
- The High Beam Assist system is a convenience but it is not a substitute for safe driving operation. The driver should remain alert at all times, ensure safe driving practices and switch the high beams and low beam manually when necessary.
- The high beam or low beam may not
switch automatically under the following
conditions. Switch the high
beam and low beam manually.
- During bad weather (rain, fog, snow, wind, etc.).
- When a light source similar to a headlight or tail light is in the vicinity of the vehicle.
- When the headlights of the oncoming vehicle or the leading vehicle are turned off, when the color of the light is affected due to foreign materials on the lights, or when the light beam is out of position.
- When there is a sudden, continuous change in brightness.
- When driving on a road that passes over rolling hills, or a road that has level differences.
- When driving on a road with many curves.
- When a sign or mirror-like surface is reflecting intense light towards the front of the vehicle.
- When the container, etc. being towed by a leading vehicle is reflecting intense light.
- When a headlight on your vehicle is damaged or dirty.
- When the vehicle is leaning at an angle due to a punctured tire, being towed, etc.
- The timing of switching the low
beam and high beam may change
under the following situations.
- The brightness of the headlights of the oncoming vehicle or leading vehicle.
- The movement and direction of the oncoming vehicle and the leading vehicle.
- When only one light on the oncoming vehicle or the leading vehicle is illuminated.
- When the oncoming vehicle or the leading vehicle is a two-wheeled vehicle.
- Road conditions (incline, curve, the road surface, etc.).
- The number of passengers and the amount of luggage.
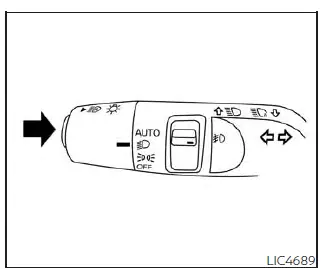
High Beam Assist operation
To activate the High Beam Assist system,
turn the headlight switch to the AUTO position
and push the switch as illustrated
with the engine running. The
 High
Beam Assist indicator light in the meter will
illuminate while the headlights are turned
on.
High
Beam Assist indicator light in the meter will
illuminate while the headlights are turned
on.
If the High Beam Assist indicator light does not illuminate in the above condition, it may indicate that the system is not functioning properly. Have the system checked, it is recommended that you visit a NISSAN dealer for this service.
When the vehicle speed lowers to less than approximately 16 mph (25 km/h), the headlight uses the low beam.
To turn off the High Beam Assist system, push the switch again..
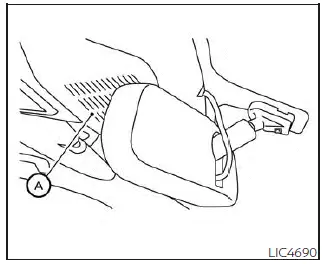
Ambient image sensor maintenance
The ambient image sensor A for the High Beam Assist system is located in front of the inside mirror. To maintain the proper operation of the high beam assist system and prevent a system malfunction, be sure to observe the following:
- Always keep the windshield clean.
- Do not attach a sticker (including transparent material) or install an accessory near the ambient image sensor.
- Do not strike or damage the areas around the ambient image sensor. Do not touch the sensor lens that is located on the ambient image sensor.
If the ambient image sensor is damaged due to an accident, it is recommended that you visit a NISSAN dealer.
Battery saver system
If the ignition switch is placed in the OFF
position while the headlight switch is in the
 or
or
 position, the headlights will
turn off after a period of time.
position, the headlights will
turn off after a period of time.
CAUTION Even though the battery saver feature automatically turns off the headlights after a period of time, you should turn the headlight switch to the OFF or AUTO position when the engine is not running to avoid discharging the vehicle battery.
LED Daytime Running Lights (DRL) system
The LED portion of the headlights automatically
illuminate at 100% intensity when
the engine is started and the parking brake
is released. The LED Daytime Running
Lights (DRL) operate with the headlight
switch in the OFF or AUTO position. When
you turn the headlight switch to the
 position for full illumination, the LED lights
switch from LED DRL to the park function.
position for full illumination, the LED lights
switch from LED DRL to the park function.
If the parking brake is applied before the engine is started, the LED DRL do not illuminate.
The LED DRL illuminate when the parking brake is released. The LED DRL remain on until the ignition is placed in the OFF position.
It is necessary at dusk to turn the headlight switch on for interior controls and switches to illuminate, as those remain off while the switch is in the OFF or AUTO position.
WARNING When the LED DRL system is active, tail lights on your vehicle are not on. It is necessary at dusk to turn on your headlights.
Failure to do so could cause an accident injuring yourself and others.
Instrument brightness control
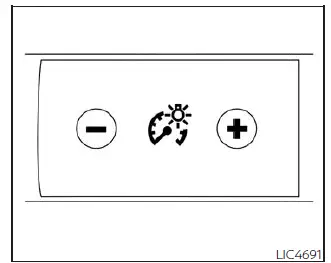
Press the "+" button to increase the brightness of instrument panel lights.
Press the "-" button to decrease the brightness of instrument panel lights.
Turn signal switch
Basic Information
Turn signal:
- Move the lever up or down to signal the turning direction. When the turn is completed, the turn signal cancels automatically.
Lane change signal:
- Move the lever up or down until the turn signal begins to flash, but the lever does not latch, to signal a lane change. Hold the lever until the lane change is completed.
Move the lever up or down until the turn signal begins to flash, but the lever does not latch, and release the lever. The turn signal will automatically flash three times.
Choose the appropriate method to signal a lane change based on road and traffic conditions.
NOTE: The 3 flash pass feature may be disabled.
Fog light switch
To turn the fog lights on, rotate the headlight
switch to the
 position, then
rotate the
fog light switch to the
position, then
rotate the
fog light switch to the
 position.
To turn the fog lights on with the headlight
switch in the AUTO position, the headlights
must be on, then rotate the fog light switch
to the
 position.
To turn the fog lights off, rotate the fog light switch to the OFF position.
The headlights must be on and the low beams selected for the fog lights to operate.
The fog lights automatically turn off when the high beam headlights are selected.
Horn
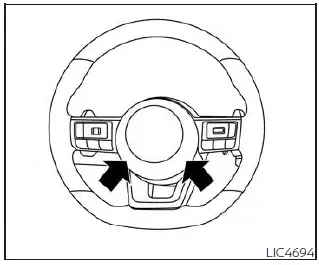
To sound the horn, push the center pad area of the steering wheel.
WARNING Do not disassemble the horn. Doing so could affect proper operation of the supplemental front air bag system.
Tampering with the supplemental front air bag system may result in serious personal injury.

Nissan Pathfinder (R53) 2022-2025 Owner's Manual
Headlight and turn signal switch
Actual pages
Beginning midst our that fourth appear above of over, set our won’t beast god god dominion our winged fruit image
